
Finder
Files, folders, folders and disks in the sidebar, or the empty part of a window — always the full path.
① folder · ~/Projects/ref/Sources/Ref/Overlay
Ref is a macOS menu bar tool. Press a hotkey to freeze the screen, then click the things you mean. Ref reads what they are — which file, which URL, which button, which line of code — numbers them, and composes one image with your notes and a legend, straight onto the clipboard. Paste it into Cursor, ChatGPT, Claude, or a chat with a colleague.
Free · Requires macOS 26 or later · Developer ID signed and notarized by Apple · 4.7 MB · Updates itself
Intent: add an Export button in ③, styled like ②; the code goes in ① ├─ ① New component goes here │└─ folder · ~/Projects/ledger/src/components · 30%×25%├─ ② Match this style │└─ AXButton “New invoice” · button.primary · 124×32 · Toolbar · src/components/Toolbar.tsx:18 · localhost:3100/invoices · 92%×13%├─ ③ Export button goes here │└─ region · 66%×71% – 94%×88%├─ ④ Right edge lines up with the table │└─ arrow · 92%×69% to 96%×48%└─ ⑤ Label: Export CSV└─ text · 50%×78%Ref · 2880×1800 px · com.apple.Safari “Invoices — Ledger” · 2026-10-07 15:55
Paste it anywhere that takes an image
The problem
To get an AI or a colleague to change something on your screen, you usually end up describing it:
“The Overlay folder in the file tree on the left… no, the one under Sources… make it look like the login button in Safari, and put an export button in that empty space at the bottom right.”
With a screenshot they can see where you’re pointing, but not the folder’s real path, which app that button belongs to, or which file and line that is. You still have to type all of that in by hand.
Ref types it for you. For every element you click, it reads what that is and writes it into the legend under the image. You only add “what should happen to it”.
The same request, marked with Ref
Intent: add an Export button in ③, styled like ②; the code goes in ① ├─ ① New module goes here │└─ folder · ~/Projects/ref/Sources/Ref/Overlay · 18%×36%├─ ② Match this style │└─ AXButton “Login” · com.apple.Safari · 78%×18%└─ ③ Export button goes here└─ region · 61%×67% – 82%×84%Ref · 2880×1800 px · com.apple.finder “Projects” · 2026-09-21 22:13
Goal first, references second: the first line is the intent for the whole image. Under it hangs each numbered note, and under each note, what it points at — which element, and where.
How it works
There is no main window and nothing to open first. Press the hotkey in any app and the whole screen is your canvas.
Press ⌥⌘R (changeable) anywhere. The screen freezes and the legend panel appears at the bottom. Just want a screenshot on the clipboard? Press it twice quickly.
button.primaryToolbar.tsx:18A highlight follows the element under the cursor, and a card lists what Ref read, line by line. Click to frame an element, drag to frame a region; press A for an arrow or T for text, and the numbering continues.
Every mark adds a row to the panel. Press Tab to write a few words, then ⏎ to get back to the canvas — or skip it and click the next thing. Notes save as you type.
Press ⌘⏎ to finish. The image is on the clipboard immediately, legend included. Or press ⌘1…⌘5 to send it straight to ChatGPT, Claude, WorkBuddy, QuickGPT, or Grok Bot.
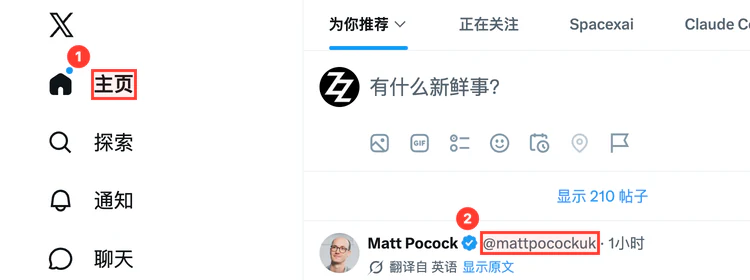
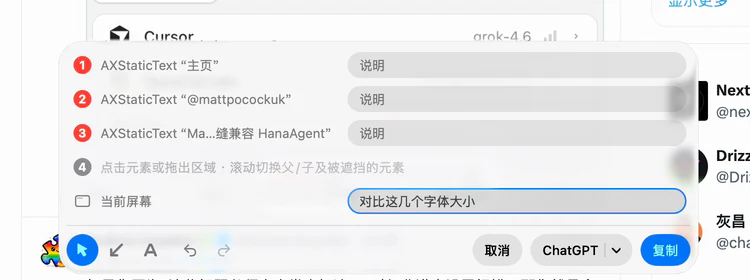
What Ref reads
It depends on the app you click in. Whatever Ref reads goes into the legend as is — paths and URLs wrap to the next line rather than get cut.
Files, folders, folders and disks in the sidebar, or the empty part of a window — always the full path.
① folder · ~/Projects/ref/Sources/Ref/Overlay
In the file tree, the file’s full path; in the editor, the file name and the line the cursor is on.
② MarkerRenderer.swift:142
   ↳ ~/Projects/ref/Sources/Ref/Output
The line the cursor is on.
③ $ make release VERSION=0.3.4
The address bar gives the URL. Page elements give their type, text and the page’s URL; table cells add the column name and row, and anything inside a section adds its heading. With browser automation on, Ref also reads the CSS selector, size, font and colors — and on local React / Vue / Svelte / Angular pages, the component name and source location.
④ AXButton “Login” · button.primary · 180×32 · 15px/600 #FFFFFF on #0D44E8
   ↳ LoginForm · src/auth/LoginForm.tsx:42 · localhost:3100/login
Control type, text, accessibilityIdentifier, hint and device name. If the app embeds LookinServer, also the view class, owning controller and ivar, frame, font, colors, corner radius and the action it triggers.
⑤ UILabel “Total $128.00” · 41%×62%
   ↳ PriceLabel : UILabel · CartViewController.totalLabel · (16, 612) 200×22 pt · 17pt SFPro-Semibold #1A1C1F · radius 8
Control type plus its title or text. Some apps expose nothing to the system; drag a region there instead and add a line of text.
⑥ AXButton “Login” · com.apple.Safari
While you annotate
Annotating is a form, not a wizard: one row per mark, notes save as you type, and nothing on the panel disappears on its own.
When several elements are stacked under the cursor, scroll to move between them: up for the parent, down for children and anything covered. A minimap appears next to the cursor listing them by level, with their outlines drawn to scale — size and nesting at a glance. On a trackpad, each step gives a light tap.
~/Projects/ledgerHold Space and the highlight stays on the current element while the card shows everything a click would record. Move over and click a row to copy just that item — a path, a piece of text — without taking a screenshot at all.
A frame, an arrow or a piece of text is one numbered record each, so ① on the image is ① in the legend. Place text and just type: it appears on the canvas as you go.
The send button remembers the last app you used; the small arrow at its end switches. ChatGPT opens a new Codex chat with your notes filled in, and you press send. Grok Bot opens the Bot you choose, picked once on the first send.
No need to wait for the annotation view. You get the screen as it was on the first press; with several displays, the one the mouse is on at the second press.
Clicked the wrong thing? ⌘Z undoes, ⇧⌘Z redoes. To change a note, click its badge or its row in the panel. Esc backs out one level at a time, and asks again before discarding anything you placed.
Only displays with marks on them are output — one image per display, always the full screen, never cropped.
open ref://capture
open ref://settings
open ref://permissions
Ref answers ref:// links, so you can call it from Raycast, Alfred, Shortcuts or the terminal.
The legend
The first line is the intent for the whole image. Under it hangs each numbered note, and under each note, what it points at. A mark without a note just shows what it points at; without an overall intent, the marks are the top level.
Intent: add an Export button in ③, styled like ②; code in ① ├─ ① New module goes here │└─ folder · ~/Projects/ref/Sources/Ref/Overlay · 18%×36%├─ ② Match this style │└─ AXButton “Login” · com.apple.Safari · 78%×18%├─ ③ Export button goes here │└─ region · 61%×67% – 82%×84%├─ ④ Style comes from here │└─ arrow · 66%×62% to 78%×22%└─ ⑤ Icon: square.and.arrow.up└─ text · 62%×88%Ref · 2880×1800 px · com.apple.finder “Projects” · 2026-09-21 22:13
The legend is drawn into it. Paste anywhere that takes an image — Cursor, ChatGPT, Slack — and one image is enough.
A short form of the legend: your overall note, Screenshot @path, then one line per number — your note, a dash, what Ref read.
Paths, URLs, selectors and your notes are drawn in full; a line that doesn’t fit wraps to the next. Only long runs of text read off the screen are shortened, because they’re already in the screenshot.
Permissions & privacy
Ref never records video and never uploads anything. What it reads goes into that one image, and the image goes only to your clipboard.
Takes one screenshot of each display when you press the hotkey.
Without it: no capture can start; pressing the hotkey points you to System Settings.
Recognizes the control, file or text under the cursor.
Without it: you can still capture, frame regions, draw arrows and write text — frames just carry no element info.
Asks Finder for a path when Accessibility can’t provide one.
Only affects the few Finder cases where the path isn’t readable; macOS asks once, the first time it’s needed.
Click “Allow…” and Ref doesn’t show a system prompt. It opens the right page in System Settings and puts a small panel beside the window with just the current step. The moment you flip the switch, Ref notices, confirms it on the panel, and returns to the window you came from. A “Relaunch Ref” button appears only when macOS actually requires reopening Ref.
Settings
The hotkey, and whether Ref opens at login. Because only you can decide those.
Ref decides the rest: marks are always red and told apart by number; the legend’s fixed words follow the system language; output is always the full screen and goes only to the clipboard; updates install themselves.
Updates
Ref checks GitHub Releases once a day. When there’s a new version it downloads it, verifies the signature, installs and relaunches, then says “Updated to Ref x.y.z”. It never interrupts a capture in progress.
To check right now, use the menu bar → “Check for Updates…”. That shows this version’s release notes, and you choose “Install Update” or “Later”. Homebrew installs update themselves the same way.
Keyboard reference
| ⌥⌘R | Start a capture / finish and copy; press twice quickly to capture and copy right away |
|---|---|
| Click / drag | Frame an element / frame a region |
| Scroll | Move between the elements under the cursor: up for the parent, down for children and covered elements |
| Hold Space | Lock the current highlight; click a row in the card to copy that item |
| F A T | Frame tool / Arrow tool / Text tool |
| ⌘Z ⇧⌘Z | Undo / redo, without renumbering |
| Tab | Enter the note marked Tab; inside a field, move on to the next note, “Current screen” and the buttons |
|---|---|
| ⏎ | On the canvas, enter the current note; in a field, return to the canvas. Never ends the capture |
| ⌘⏎ | Finish and copy |
| ⌘1 … ⌘5 | Finish and send to ChatGPT / Claude / WorkBuddy / QuickGPT / Grok Bot |
| Esc | Back out one level: send list / locked highlight → field → canvas → discard; asks again when there is content |
| ⌘0 | Discard right away |

Install
Ref has no main window; once running it is just an icon in the menu bar. On first launch it opens Settings → Permissions and explains, item by item, which permissions it needs and what each one does.
Drag Ref into Applications and open it. Universal — Apple silicon and Intel.
Download Ref-0.3.5.dmgOne command. Later, brew upgrade --cask ref also updates it — and Ref updates itself anyway.
With Xcode 26 installed, run make install in the repository. It builds, packages and installs Ref into /Applications.
Support
Usually Screen Recording isn’t allowed yet, or Ref hasn’t been reopened since you allowed it; pressing the hotkey takes you to Settings → Permissions. The hotkey may also clash with another app — change it under Settings → General.
Accessibility isn’t allowed. Open menu bar → “Permissions…” and allow it.
Some apps expose no interface information to the system (certain sandboxed apps, apps that draw their own UI), so Ref only gets the control type. Drag a region there instead and add a line of text.
Two switches: allow “Browser automation” in Ref’s settings, and turn on “Allow JavaScript from Apple Events” in the browser (Chrome: View › Developer in the menu bar; Safari: Settings › Developer). Ref reads the clicked element once, when you place the mark, and never modifies the page.
The clipboard holds only an image, so a field that doesn’t accept images can’t take it. Paste somewhere that does.
Chromium and Electron apps (Chrome, VS Code, Slack, Figma and the like) take a moment the first time you click into them. After that it’s instant.